■Form Stuff 作成1 - ImageButton
1. 次のようにEclipseから新しいプロジェクトを生成します。
2. res -> layout -> main.xmlファイルのソースコードを修正します。
main.xmlを修正します。
<?xml version="1.0" encoding="utf-8"?> <LinearLayout xmlns:android="http://schemas.android.com/apk/res/android" android:orientation="vertical" android:layout_width="fill_parent" android:layout_height="fill_parent" > <ImageButton android:id="@+id/android_button" android:layout_width="100dip" android:layout_height="wrap_content" android:src="@drawable/android" /> </LinearLayout> |
上のコードを見ると、LinearLayout の中に ImageButtonが配置されています。
3. ImageButtonを実装して見ます。
[ImageButtonで使用するイメージ]
を res -> drawable-hdpi フォルダに追加します。
次はsrc -> my.HelloFormStuff -> HelloFormStuff.java ファイルを修正します。
package my.HelloFormStuff; import android.app.Activity; import android.os.Bundle; import android.view.View; import android.view.View.OnClickListener; import android.widget.ImageButton; import android.widget.Toast; public class HelloFormStuff extends Activity { /** Called when the activity is first created. */ @Override public void onCreate(Bundle savedInstanceState) { super.onCreate(savedInstanceState); setContentView(R.layout.main); final ImageButton button = (ImageButton) findViewById(R.id.android_button); button.setOnClickListener(new OnClickListener() { public void onClick(View v) { // Perform action on clicks Toast.makeText(HelloFormStuff.this, "Beep Bop", Toast.LENGTH_SHORT).show(); } }); } } |
上のコードで必要なpackageは Ctrl + Shift + O を押すと自動追加されるが、 Ctrl+ Shift + O を押すと次のような選択画面が表示されます。
この時、上のOnClickListenerを選択してFinishを押下します。
次は Ctrl+F11 を押下して実行します。
ImageButtonを押すと、下の方に「Beep Bop」と文字が表示されるのが見れます。
次はソースコードを変更してみましょう。
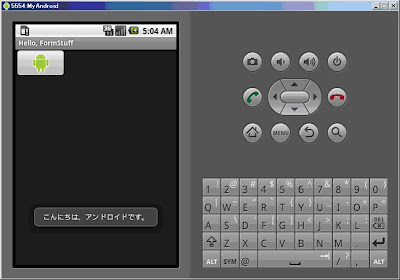
Toast.makeText(HelloFormStuff.this, "こんにちは、アンドロイドです。", Toast.LENGTH_LONG).show(); |
出力する文字列を変更して、Toast.LENGTH_LONG に変更します。
Toast.LENGTH_LONG が Toast.LENGTH_SHORTより長く表示されます。
[ 実行結果 ]


